Build a Modern Webpage Dialog in Dynamics 365 Using Ribbon Commands and JavaScript
May 24, 2026
#Dynamics 365
Chetan Jha
Introduction
Sales and service teams working in Dynamics 365 often need to assign follow-up tasks while staying on an Account record. This guide walks you through building a Create Task button on the Account command bar that opens a custom HTML web resource webpage. Users fill in task details and submit — the Task is created in Dataverse and linked to the Account automatically, without navigating away from the form.
Business Scenario
The standard New Task button in Dynamics 365 takes users away from the Account form, breaking their context. The goal is to replace that with a dedicated Create Task button that opens a modern webpage form in a separate window. On submit, the task is created via the Dataverse Web API and linked to the Account through the Regarding field. The Account timeline refreshes immediately to show the new task.
Entity
Logical Name
Account
account
Task
task
Task Field
Need help with your business solution?
Our team can help you implement the right solution for your organization.
A Microsoft 365 account with Dynamics 365 and Power Apps access
Access to make.powerapps.com and an active Dataverse environment
Permission to create and publish solutions and web resources
Basic familiarity with Model-Driven Apps and JavaScript
Publisher Prefix: Throughout this guide, the prefix testpubl_ is used. Replace this with your own publisher prefix wherever you see it in web resource names.
Step-By-Step Guide
Step 1: Create the JavaScript Web Resource
Inside your solution, click New, hover over More, and select Web resource.
Field
Value
Display Name
Account Task Handler JS
Name
testpubl_new_accounttaskhandler (use your publisher prefix)
Type
Script (JScript)
Paste the following JavaScript into the editor:
var TaskHandler = TaskHandler || {};
TaskHandler.Ribbon = {
openCreateTaskDialog: function (primaryControl) {
if (!primaryControl) {
Xrm.Navigation.openAlertDialog({ text: "Form context not available.", title: "Error" });
return;
}
var formContext = primaryControl;
var rawId = formContext.data.entity.getId(); // GUID of the currently open record
if (!rawId || rawId.trim() === "") {
Xrm.Navigation.openAlertDialog({ text: "Please save the Account record first.", title: "Record Not Saved" });
return;
}
var accountId = rawId.replace(/[{}]/g, "").toLowerCase().trim();
var accountName = formContext.data.entity.getPrimaryAttributeValue() || "";
var dataParam =
"regardingId=" + encodeURIComponent(accountId) +
"®ardingName=" + encodeURIComponent(accountName) +
"®ardingType=account"; // CHANGE: update to contact, opportunity etc. if needed
Xrm.Navigation.openWebResource(
"testpubl_new_createtaskdialog", // CHANGE: use your publisher prefix + HTML web resource name
{ height: 580, width: 720 },
dataParam
);
}
};
primaryControl — Passed by Command Designer when Parameter Type is PrimaryControl. Gives access to the current open form and record.
getId() — Reads the GUID of the open Account record. This ID is sent to the HTML page as regardingId so it can link the new Task.
"testpubl_new_createtaskdialog" — Logical name of the HTML web resource created in Step 2. Change the prefix to match your publisher.
height / width — Controls the webpage size in pixels. Adjust to suit your screen layout.
Click Save and then Publish.
Step 2: Create the HTML Web Resource (Webpage UI)
This is the webpage users see when they click the ribbon button. It opens in a separate browser window with its own URL. It contains the Task form fields, client-side validation, and the Dataverse Web API call that creates the Task.
Inside your solution, click New, hover over More, and select Web resource again.
Field
Value
Display Name
Create Task Dialog HTML
Name
testpubl_new_createtaskdialog (use your publisher prefix)
Type
Webpage (HTML)
The complete HTML file includes a full custom UI — dark header, progress bar, grouped field cards, real-time validation, and a success overlay. The structure below shows the key sections. Build the UI using the CSS variables in :root {} — change --accent, --ok, and --warn to match your brand colors.
ClientGlobalContext.js.aspx — Must be the first script tag. Without it, Xrm.Utility.getGlobalContext() fails and no Task can be created.
parseAllParams() — Reads regardingId and regardingName from the URL. Xrm.Navigation.openWebResource wraps parameters under a Data= key — this function handles that correctly.
submitTask() — To link to Contact instead of Account, change regardingobjectid_account@odata.bind to regardingobjectid_contact@odata.bind and /accounts( to /contacts(.
Click Save and then Publish.
Step 3: Add the Ribbon Button Using Command Designer
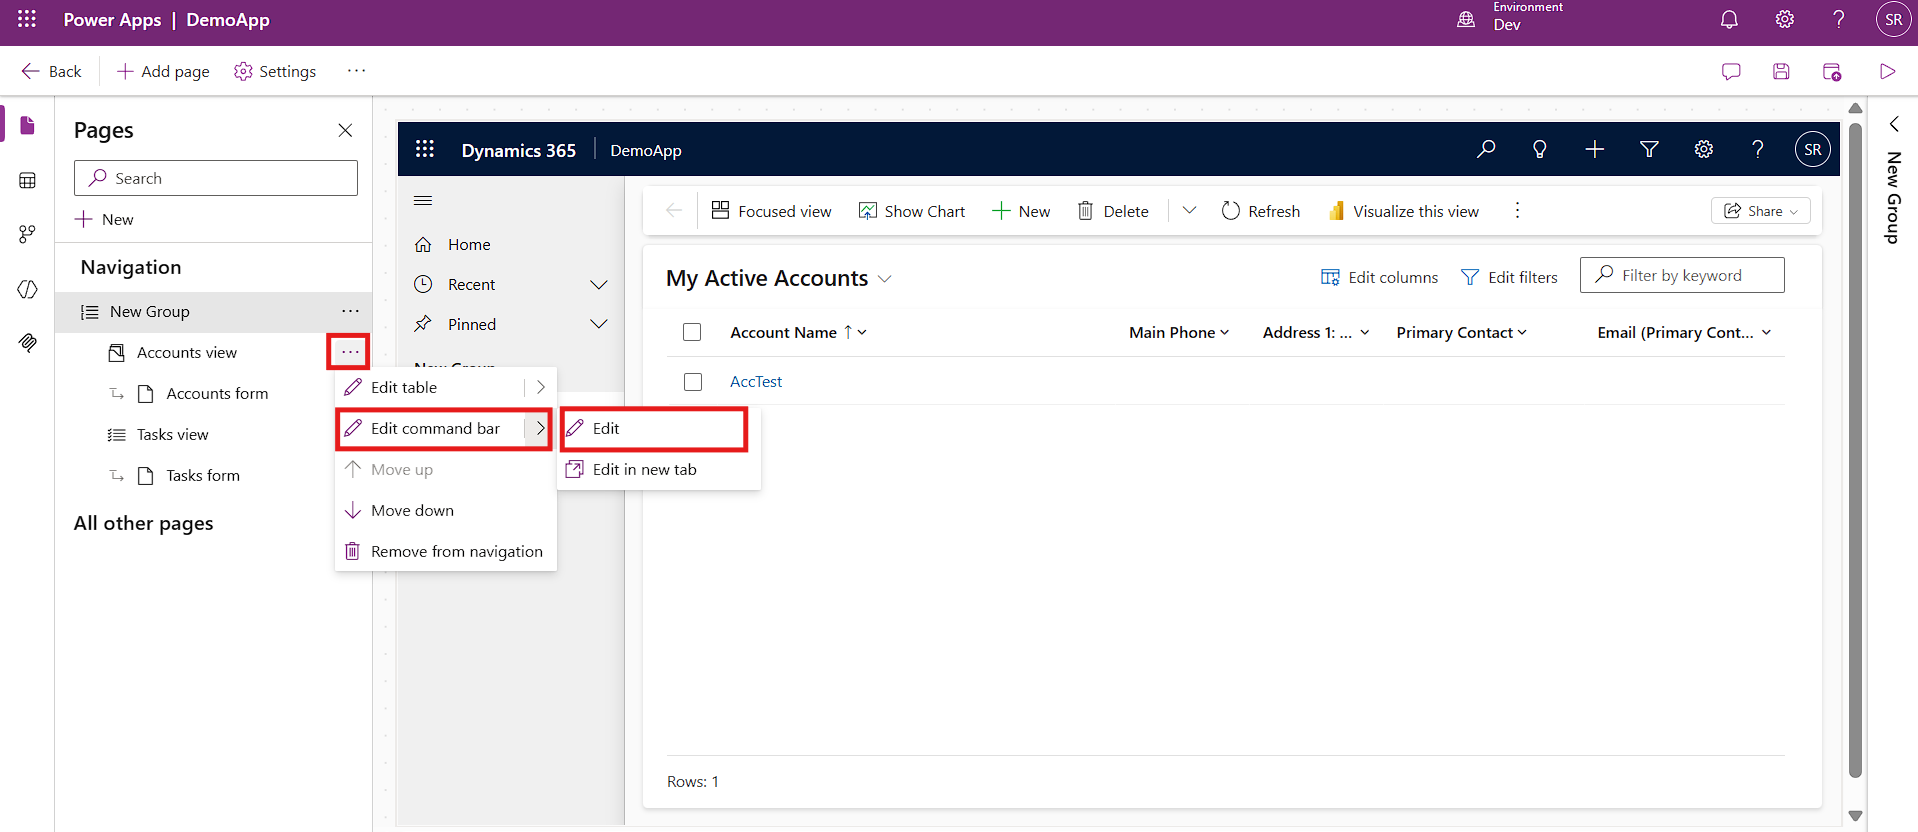
In the App Designer, find the Accounts view in the navigation panel. Click the three dots next to it, hover over Edit command bar, and click Edit.
In the Edit command bar for Accounts dialog, select Main form and click Edit.
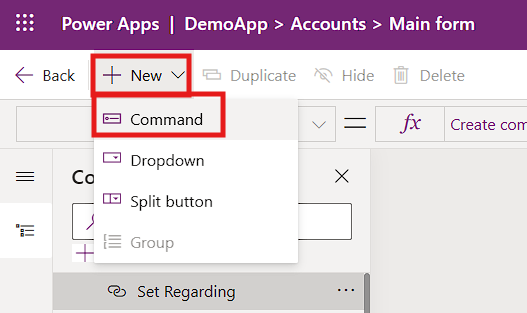
The Command Designer opens. Click New and select Command from the dropdown.
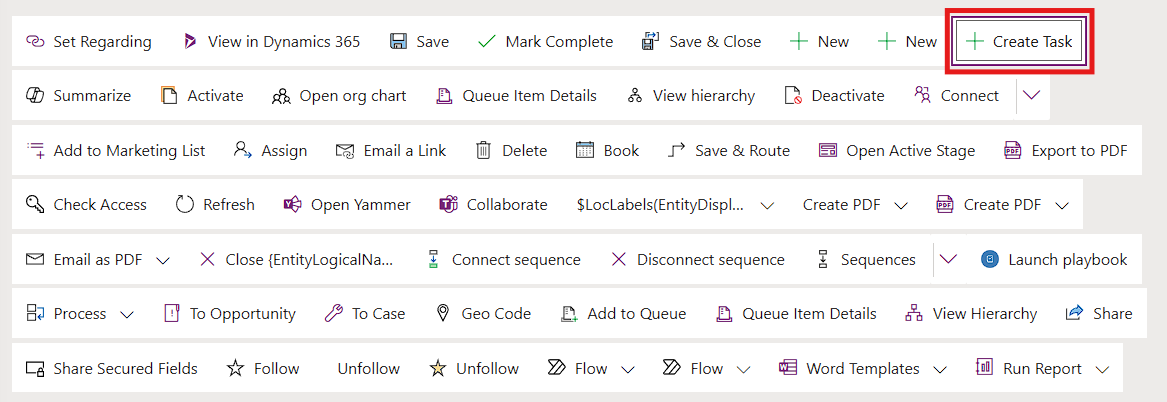
Your new command appears in the command bar preview.
In the Command panel on the right, configure the following settings:
Field
Value
Label
Create Task
Icon
Choose any Fluent icon from the dropdown
Action
Run JavaScript
Library
testpubl_new_accounttaskhandler (your JS web resource)
Function name
TaskHandler.Ribbon.openCreateTaskDialog
Parameter 1 Type
PrimaryControl
Visibility
Show
Tooltip title
Create a New Task
Click Save and Publish in the top right corner of the Command Designer.
Step 4: Test the Solution End to End
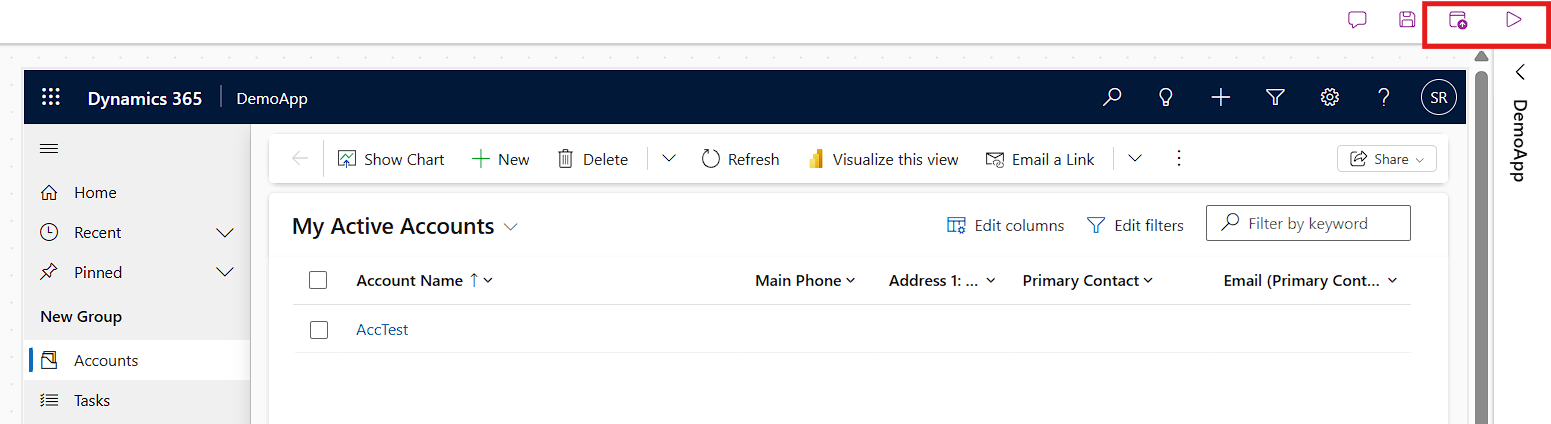
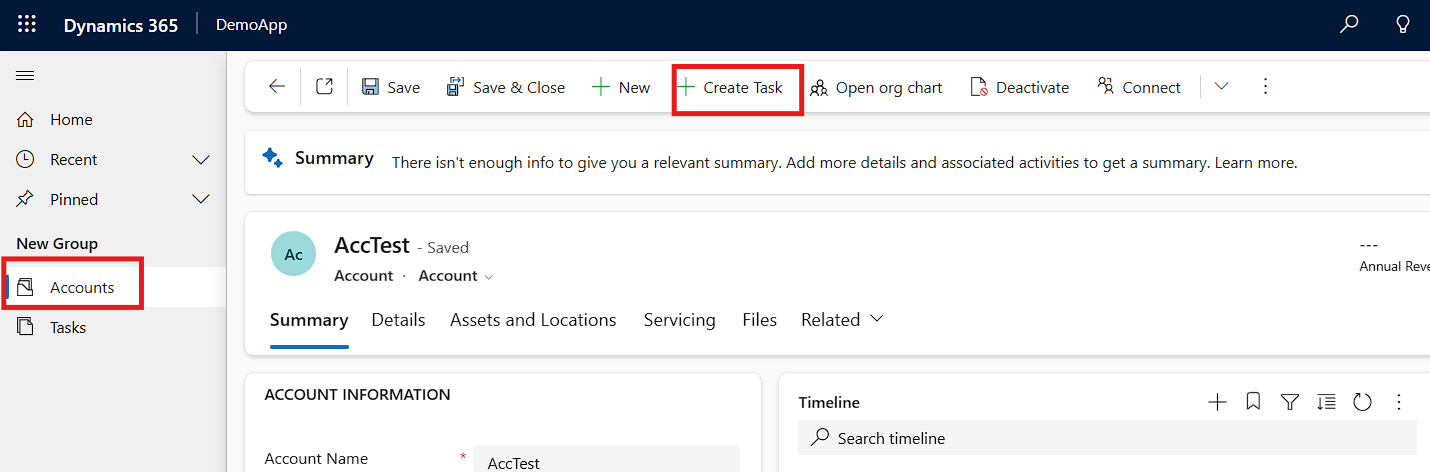
Open your Model-Driven App. In the left navigation, click Accounts and open any existing Account record. The Create Task button appears in the command bar.
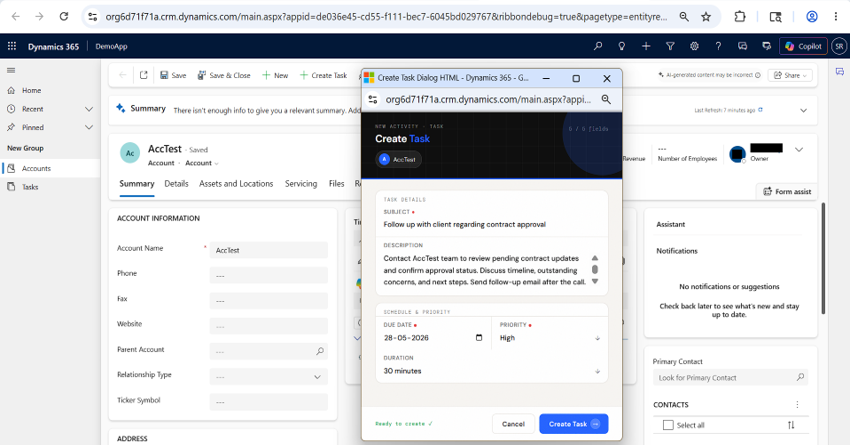
Click Create Task. A new browser window opens showing the Account name in the dark header. The progress bar tracks field completion and the counter updates in real time.
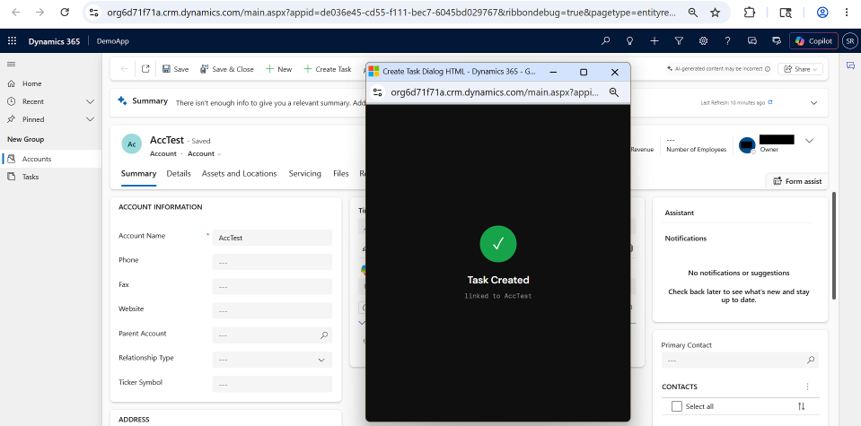
Fill in Subject, Due Date, and Priority. Click Create Task. On success, a full-screen dark confirmation overlay appears confirming the Task was created and linked to the Account.
The webpage closes automatically after 2 seconds. The Account form timeline refreshes and the new Task appears under the Recent section.
Conclusion
By combining ribbon commands, JavaScript web resources, and the Dataverse Web API, you can build reusable webpage experiences that keep users in context without third-party tools. The same pattern works on Contact, Opportunity, or any other entity by updating the entity reference in two lines of code. Try it in your next project and share your experience in the comments.
Frequently Asked Questions (FAQ)
1. Why does my webpage show Unknown Account?
The most common cause is the Parameter Type in the Command Designer being set to String instead of PrimaryControl. Go to the Command Designer, find your Create Task command, scroll to Parameter 1, and confirm the type is PrimaryControl with no value entered. Save and Publish again.
2. Why does the webpage appear blank when it first opens?
A blank page is almost always a mismatch between the web resource logical name in the JavaScript and the actual name registered in the solution. Verify that the name passed to Xrm.Navigation.openWebResource exactly matches the Name field of your HTML web resource, including the publisher prefix — for example testpubl_new_createtaskdialog.
3. Can I use this on the Contact or Opportunity form?
Yes. The JavaScript reads the form context generically and works on any entity. In the HTML web resource, change regardingobjectid_account@odata.bind to regardingobjectid_contact@odata.bind and /accounts( to /contacts(. Then register a new ribbon command on the Contact table pointing to the same two web resources.
4. The Task is created but not showing in the Account timeline. Why?
The timeline refresh relies on window.opener.Xrm.Page.data.refresh(false) being called after the Task is created. If the Account form was opened in a new tab or the browser blocked the opener reference, this call silently fails. Manually refresh the Account form and the Task will appear.